Wednesday, March 30, 2011
Wednesday, March 23, 2011
Talk to me Tuesday: Warbler Style
Whoops, forgot to post this last night after I uploaded it, my bad!
Tuesday, March 15, 2011
Sunday, March 13, 2011
Sunday Squee!
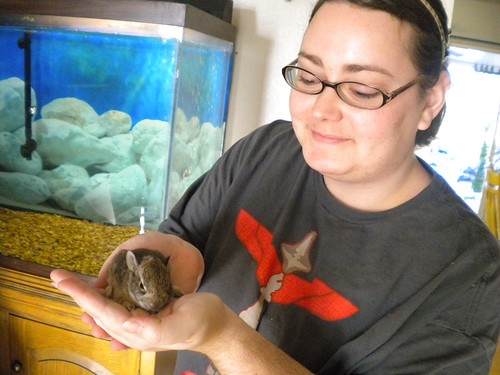
It's Spring time, so all sorts of yard work is going on. Just a few minutes ago my dad brought a teeny tiny little bunny in his cupped hands (this is the second time we've had a wild bunny around, not to mention that bunnies are always running around at night).
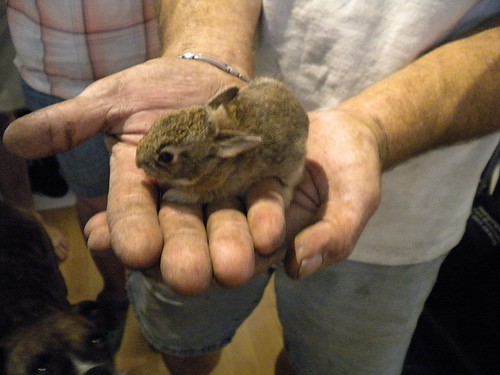
This bunny was different. He was the sweetest little bunny and didn't try to run away or anything. He wasn't scared (like the last one), and just stayed nice and calm even while we pet it. Obviously, we can't keep a wild bunny, so we took it out to the front yard (so the dogs won't get to it) and set it "loose" near some bushes in the front.

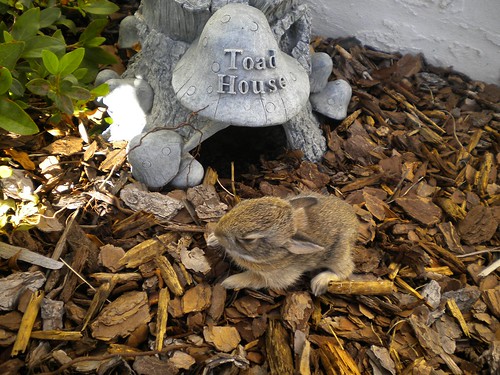
For more Florida wildlife (or rather, animals that have come into our yard/house), see this flickr set
This bunny was different. He was the sweetest little bunny and didn't try to run away or anything. He wasn't scared (like the last one), and just stayed nice and calm even while we pet it. Obviously, we can't keep a wild bunny, so we took it out to the front yard (so the dogs won't get to it) and set it "loose" near some bushes in the front.
For more Florida wildlife (or rather, animals that have come into our yard/house), see this flickr set
Tuesday, March 8, 2011
Monday, March 7, 2011
Crafty Monday: Frame Stand Review
As some of you may know I'm working on a cross stitch project that can only be described as "TOO FREAKING BIG." For this project I had to buy a 24" scroll frame and have hated it this entire time.
I have two problems with my scroll frame:
There is a solution for the second problem, and that's what I want to talk about now. A few weeks ago I decided that I really had to get working on my BAP (cross stitch terminology post for the n00bs) and decided to purchase a scroll frame stand.
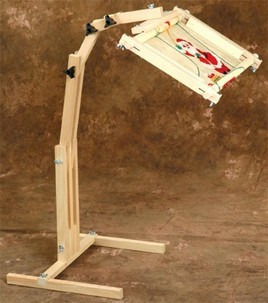
The wait for it was long and hard, but I finally got a chance to get it set up and use it. I've only used it for a few days, but I've got some thoughts on it already and I put them into list form!


It's super awkward to start and stop pretty much anywhere. I'm thoroughly convinced there is an easier way to do this without taking it off the stand. If anyone knows please enlighten me!
Final thoughts
For all of the bother this product seems to be giving me, I think it was money well spent. It's saving me the pain of holding a heavy frame and making me learn to use both hands, which is starting to seem like a good thing. I'd love to learn what other people do when they change colors (maybe something that doesn't take several minutes), but other than that I'm really enjoying it.


I have two problems with my scroll frame:
- 1. The tension sucks - I cannot keep my fabric tight to save my life. The screws are as tight as they can go, but it doesn't help the tension. The horizontal tension is non-existant and lacing the fabric to the sides of the frame only helps a bit.
2. It's heavy as hell - not only is it heavy, it's awkward to hold.
There is a solution for the second problem, and that's what I want to talk about now. A few weeks ago I decided that I really had to get working on my BAP (cross stitch terminology post for the n00bs) and decided to purchase a scroll frame stand.
The wait for it was long and hard, but I finally got a chance to get it set up and use it. I've only used it for a few days, but I've got some thoughts on it already and I put them into list form!
- Pros
- Can use both hands when I want to (I tried the one under the fabric and one over the fabric method just for fun)
- No wrist pain
- No awkward and painful moments where I accidentally smack myself in the face with the heavy wooden frame
- Faster stitching
- Cons
- No fast way to flip it over to check the back
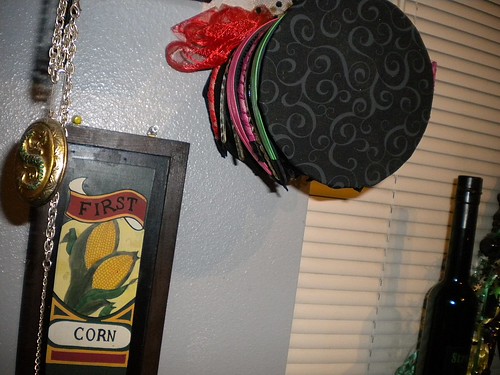
- It is insanely difficult to start and stop in places. Any time there is a floss change I have to loosen one part and work on it upside down. I think I might be missing something (see the two photos below)
- Awkward placement. I'm used to having my projects at a certain angle (directly in front of my face) and that angle is impossible with the holder.


It's super awkward to start and stop pretty much anywhere. I'm thoroughly convinced there is an easier way to do this without taking it off the stand. If anyone knows please enlighten me!
Final thoughts
For all of the bother this product seems to be giving me, I think it was money well spent. It's saving me the pain of holding a heavy frame and making me learn to use both hands, which is starting to seem like a good thing. I'd love to learn what other people do when they change colors (maybe something that doesn't take several minutes), but other than that I'm really enjoying it.


Friday, March 4, 2011
Friday Project: Headband Stand
I currently have a headband fixation. It might be because I can put on a headband right after taking a shower and not have to worry about drying my hair, or that no matter what I always look good with a headband, but either way I am obsessed with wearing headbands right now. Because I'm insanely disorganized and forgetful, it's sometimes a battle to find a headband in the morning. While I'd like to keep all of them in the bathroom, there simply isn't room for that. So, I decided I needed a stand to put them on.
The first step was finding something to make the stand out of. I asked my dad if he had anything in the shed or his shop that would work and he brought me an empty roll of spline (he removed the larger cardboard pieces, so it was just the center). When I put a headband on it to see how it would work, I realized I just needed some padding and it would be the perfect size!

I pulled out some supplies: cardboard from a case of ramen, batting (I only had some low loft, so I folded it until it was thick enough), my favorite black swirl fabric (as seen in almost every quilting project I've ever done), and a hot glue gun.
I glued the batting around the tube and glued a tiny spot of the fabric onto the batting so it could be held in place.

I wrapped the fabric around the batting and rather than glue it down (since it would look quite awful) I folded the fabric and pinned it down.

I hate hand sewing anything (but I adore cross stitching, go figure). I grabbed a needle and some heavy duty thread and in less than 5 minutes I had it all sewn together.

Now here's the part where I admit my mistake. I forgot to take pictures of one of my steps. I cut out two circles of cardboard: one for the front and one for the back. The one in the front was larger than the tube and the one in the back was smaller. I cut out some more fabric and covered the first piece of cardboard with it. The smaller piece was tricky. I was going to use a different method to secure it to my wall, but I wanted to go with something fast and easy.
Using a hole puncher, I put two holes into the cardboard and glued some pushpins on there.

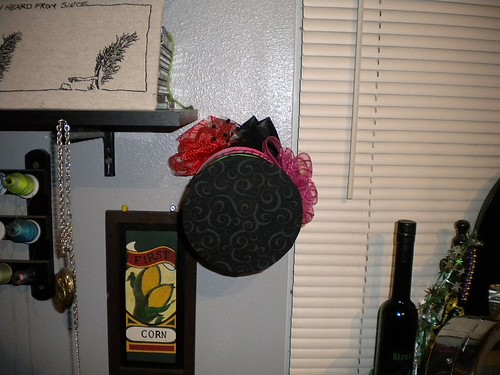
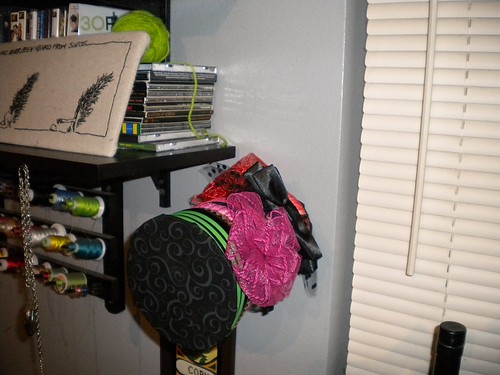
And the finished product!

With an hour and a half of my time I created something that is not only functional, it is pretty spiffy looking. I won't lose my headbands and it'll keep the more fragile ones from being ruined. The best part is that I already had all of the supplies just sitting around. Here it is in my room and it fits perfectly between some shelves and my vanity.
The first step was finding something to make the stand out of. I asked my dad if he had anything in the shed or his shop that would work and he brought me an empty roll of spline (he removed the larger cardboard pieces, so it was just the center). When I put a headband on it to see how it would work, I realized I just needed some padding and it would be the perfect size!

I pulled out some supplies: cardboard from a case of ramen, batting (I only had some low loft, so I folded it until it was thick enough), my favorite black swirl fabric (as seen in almost every quilting project I've ever done), and a hot glue gun.
Note: Maybe you shouldn't use a hot glue gun when working with batting and fabric, but I wanted a fast project and I didn't mind burning my fingers
I glued the batting around the tube and glued a tiny spot of the fabric onto the batting so it could be held in place.

I wrapped the fabric around the batting and rather than glue it down (since it would look quite awful) I folded the fabric and pinned it down.

I hate hand sewing anything (but I adore cross stitching, go figure). I grabbed a needle and some heavy duty thread and in less than 5 minutes I had it all sewn together.

Now here's the part where I admit my mistake. I forgot to take pictures of one of my steps. I cut out two circles of cardboard: one for the front and one for the back. The one in the front was larger than the tube and the one in the back was smaller. I cut out some more fabric and covered the first piece of cardboard with it. The smaller piece was tricky. I was going to use a different method to secure it to my wall, but I wanted to go with something fast and easy.
Using a hole puncher, I put two holes into the cardboard and glued some pushpins on there.

And the finished product!

With an hour and a half of my time I created something that is not only functional, it is pretty spiffy looking. I won't lose my headbands and it'll keep the more fragile ones from being ruined. The best part is that I already had all of the supplies just sitting around. Here it is in my room and it fits perfectly between some shelves and my vanity.
Thursday, March 3, 2011
Subscribe to:
Posts (Atom)

