- Things Mentioned:
- Jackson Rathbone cross stitch
- Did I leave the gas on? stitch
- New camera case
Wednesday, October 28, 2009
Talk to me Tuesday: Secrety McSecretson
Apologies for the lack of the crafty monday post, but I promise next week is going to be super awesome!
Wednesday, October 21, 2009
Monday, October 19, 2009
Crafty Monday: Quilt Decision Maker Tutorial
In the past I've learned many things about quilting, but one of the things that stands out most is the fact that it requires a lot of decision making. I'm horrible with decisions (which is why my quilt blocks sat for an entire year before I got serious about finishing it). What helped me is what I'm going to call my "Quilt Decision Maker" aka - laminated scans of my quilt blocks.
This tutorial is not for an actual quilt. The first QDM can be seen in my October 13th Talk to me Tuesday. For this tutorial I used my Legend of Zelda blocks (that will not be a quilt any time soon). The blocks are my pride and joy and can be found on the guest designer page at Sewhooked.org.
Step 1: Scanning
The first step (not pictured) will most likely be the most time consuming of all. All blocks need to be scanned and put into a folder that can be found easily. If your blocks are larger than your scanner, scan each half and then join them in your graphics program of choice.
Step 2: Printing

In a Word document create a table (I used the labels feature, but it is the same exact idea). Insert each of the scanned blocks into the cells. This will guarantee that all printed blocks are roughly the same size and fit on an 8x11.5" piece of paper. The order of the blocks are not important at all. You can arrange them later.
Step 3: Cutting

Take the printed sheet of paper and cut all of the blocks out. Let me note here that you can use either cardstock or regular paper. It doesn't make any difference in the long run.
Step 4: Arranging

Now is the time to arrange the blocks in whichever configuration you think is best. Once you've decided you can start to set them on the laminate sheet (I have no clue what the devil that stuff is called). Instead of putting it on the sheet and hoping it doesn't move, I use a teeny tiny piece of tape to secure it to the area. The blocks can still be moved up to the very last minute, which is useful if you are indecisive.
Step 5: Laminating

My laminator is a very inexpensive one from Harbor Freight Tools. It takes about 5 minutes to warm up, but less than 10 seconds to laminate a page. Once it was done laminating I realized how hastily I put the scanned blocks on the page, they are super crooked, lol.
Step 6: Finding the perfect fabric

Now you are done! Simply take your laminated sheet to the fabric store and start holding it up against various bolts to fabric to see what works. Once you've started sewing you can use the sheet as a reference to sewing order. It worked wonders for me, and I hope someone else finds it handy!
Wednesday, October 14, 2009
Monday, October 12, 2009
Crafty Monday: Getting Things Done
A few years ago I had the fun idea to make a quilt. I loved the idea and got straight to work. A few months later and I just stopped working on it. Well, it had been over a year since I had even attempted to work on the quilt.
Yesterday I took a big step in getting it done. I'm not going to say too much here, but I'll talk about it on my Talk to me Tuesday tomorrow. I feel good about it, and almost confident that I'll finish the top before the end of this year. Yay!
Also - my Twilight cover cross stitch was Featured on Craftster! *blushes furiously*
Wednesday, October 7, 2009
Monday, October 5, 2009
Crafty Monday: FINISHED!
I'd like to say something nice and eloquent about how it is rewarding to finish a big project, but I'm way past that point. I'm just relieved and excited and just HAPPY that I'm finished with this. The Twilight series is great. People who put effort into hating a book series can just suck it. They could be doing something more productive with their time, like actually reading. I really like the series (but don't care for the fandom), so it was pretty nifty to stitch the Twilight cover.

and the back
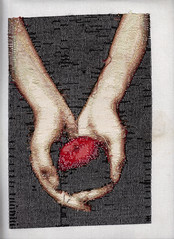
The pattern for the Twilight cover is available here and patterns for books 2-4 are here
- Stats
- 8x12"
- 24,320 stitches
- 25 colors
and the back
The pattern for the Twilight cover is available here and patterns for books 2-4 are here
Subscribe to:
Posts (Atom)