A public space for friends and family to keep up with me.

Showing posts with label tutorial. Show all posts

Saturday, May 25, 2013

Roller Derby Jam Ref Wrist Bands Photo Tutorial


As requested by Type Jo Negative of PCRD, here is a quick and simple tutorial that will make wrist bands that your jam refs will love! I made some for my league because there was always a scramble before the bout when the Head Referee asked me for bandanas of each color for the jam refs. I made a set for our league and after bouting against a nearby league, they commissioned a set. They are quick, simple, and cheap!

Supplies/Tools:
- Sewing Machine
- Scissors
- Fabric
- 2" Wide Sewable Velcro
- Scissors
- Iron (optional)
- Cutting Mat, Rotary Cutter, Ruler (optional)

note: I didn't have any velcro since I used the last of it when I made a set for someone else. For this tutorial I used some bright silver fabric, so we'll just pretend it is velcro.


Cut the fabric to 12x6" (you might want to measure your league's main jam ref's wrist while he or she is wearing a wrist guard to make sure you don't make it too small or large!)


Once you have your piece cut out, fold it inside out and hotdog style. The green dashes show where you will be sewing


Again, make sure it is inside out and sew it together (leaving the top open). Once you've sewn it together, turn it back right side out.


Fold the open edges to the inside of the wrist band.


Once I have folded the open end in, I like to iron it to make sure that those edges stay down. This is optional, but it makes it much easier.


Sew the line closed.


Now you're ready to add the velcro. Take one side (doesn't matter if it's the hook or the loop side, just make sure you're only sewing ONE of them on) and place it near the top of your wrist band. Sew the velcro about a quarter of an inch in.


Sew the next piece of velcro on the opposite end and opposite side of where you placed the last piece of velcro.


You should have to flip one side over to see both velcro bits.


Seriously, that's it! It's ready to go!


I made wrist bands for my team and all of the teams we would be playing this season. Jam refs love them because you don't have to tie them like a bandana, they're less constricting than those spandex glove covers, super visible to jammers and NSOs, and easy to switch during half-time.




Monday, October 19, 2009

Crafty Monday: Quilt Decision Maker Tutorial

In the past I've learned many things about quilting, but one of the things that stands out most is the fact that it requires a lot of decision making. I'm horrible with decisions (which is why my quilt blocks sat for an entire year before I got serious about finishing it). What helped me is what I'm going to call my "Quilt Decision Maker" aka - laminated scans of my quilt blocks.

This tutorial is not for an actual quilt. The first QDM can be seen in my October 13th Talk to me Tuesday. For this tutorial I used my Legend of Zelda blocks (that will not be a quilt any time soon). The blocks are my pride and joy and can be found on the guest designer page at Sewhooked.org.

Step 1: Scanning

The first step (not pictured) will most likely be the most time consuming of all. All blocks need to be scanned and put into a folder that can be found easily. If your blocks are larger than your scanner, scan each half and then join them in your graphics program of choice.

Step 2: Printing


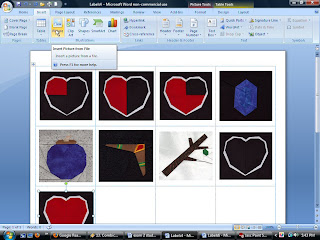
In a Word document create a table (I used the labels feature, but it is the same exact idea). Insert each of the scanned blocks into the cells. This will guarantee that all printed blocks are roughly the same size and fit on an 8x11.5" piece of paper. The order of the blocks are not important at all. You can arrange them later.

Step 3: Cutting


Take the printed sheet of paper and cut all of the blocks out. Let me note here that you can use either cardstock or regular paper. It doesn't make any difference in the long run.

Step 4: Arranging


Now is the time to arrange the blocks in whichever configuration you think is best. Once you've decided you can start to set them on the laminate sheet (I have no clue what the devil that stuff is called). Instead of putting it on the sheet and hoping it doesn't move, I use a teeny tiny piece of tape to secure it to the area. The blocks can still be moved up to the very last minute, which is useful if you are indecisive.

Step 5: Laminating


My laminator is a very inexpensive one from Harbor Freight Tools. It takes about 5 minutes to warm up, but less than 10 seconds to laminate a page. Once it was done laminating I realized how hastily I put the scanned blocks on the page, they are super crooked, lol.

Step 6: Finding the perfect fabric


Now you are done! Simply take your laminated sheet to the fabric store and start holding it up against various bolts to fabric to see what works. Once you've started sewing you can use the sheet as a reference to sewing order. It worked wonders for me, and I hope someone else finds it handy!

Monday, July 27, 2009

Crafty Monday: Etch-A-Sketch Frame Tutorial

I really loved my Etch-A-Sketch Embroidery (it got featured in Craft!), and I thought that I would share how I made the frame in 5 easy steps.

Supplies


Supplies:
- 5x7 Wood Frame (Can be purchased at Hobby Lobby or here)***
- Wood circles for knobs (Purchase here or at Hobby Lobby)
- Red Paint
- White Paint
- Gold Paint
- Tacky Glue
- Foam Brush
- Small Tip Paint Brush
- Clear Gloss Spray

Step 1: Paint the Frame

Painting the frame


Using the red paint and the foam brush, paint the frame. From my experience, it will need at least 2 coats, most likely three. Luckily the paint dries really fast on the wood, so by the time the first coat is done, you'll be ready to apply the second coat. Allow the frame to dry. I like to hang mine on a metal post on our craft space's pegboard so nothing touches it.

Letting the frame dry


Step 2: Glue the Knobs

Glue on the knobs


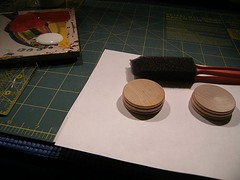
Unless you can find something the exact right size, you'll need to glue the wooden circles together with tacky glue to make it appropriately sized knobs. I glued three together, making sure the one with the smoothest surface ended up on top.


Step 3: Paint the Knobs

Getting ready to paint the knobs


Add a few coats of white paint to the knobs, and let them dry. Glue them to the Etch-A-Sketch


Step 4: Add the lettering

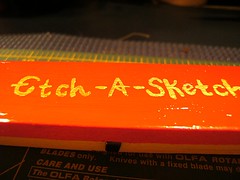
The lettering is the hardest part in my opinion


For me this is the most nerve wracking part of making the frame. My hands shake a lot when under this kind of pressure, so adding the lettering is something that needs to be done slowly and carefully. If it makes it easier, use a pencil and lightly trace out the letters you'll be putting at the top. The typical Etch-A-Sketch has the words "Magic Etch-A-Sketch Screen" at the top, but I think just the Etch-A-Sketch part looks the best.


Step 5: Spray the crap out of it

wooooooooooo fumes!


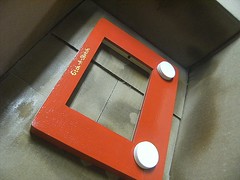
Use a glossy spray with the frame in a box in a well ventilated area (unless you really like the smell of the spray, which I totally don't, I'm just throwing it out there). It should need only 2 coats of the spray. Do the second coat only after making sure the first has dried and is no longer tacky to the touch.

wooooooooooooooo, even more fumes


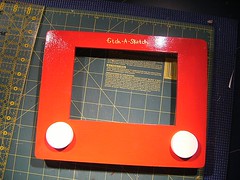
Finished!

Glossy lettering


And now you're done! If you want, you can buy a 5x7 piece of glass for the frame (the curved edges of the inside of the back may not allow you to put the glass in, so I suggest using a razor knife to make the back square so the glass can fit).

Finished product


To make an Etch-A-Sketch Embroidery the only thing you need to do is get some gray fabric, black embroidery floss and a self stick mounting board, to ensure that your stitched doodle stays flat.

I've listed the finished product on etsy, if anyone is interested


*** You will know you've purchased the correct frame by the ridiculously freaky baby picture